August 29, 2026
·
8 min read
How to Add a Live Chat Widget: 7-Step Setup
A practical 7-step guide to adding a live chat widget that works reliably and compliantly—choose the right provider, install the widget correctly, set targeting and routing rules, connect CRM/helpdesk/analytics, and handle identity plus consent controls.

Adding live chat sounds simple until it’s live: the widget loads slowly, routes messages to the wrong team, or collects data you can’t confidently explain to users.
This guide walks you through a clean, repeatable setup—from choosing a provider and defining goals to installing the code, configuring triggers, connecting your CRM/helpdesk, and adding identity and consent. You’ll end up with chat that supports customers without creating operational or privacy headaches.
Plan the Stack
Plan before you paste any widget code. Your provider choice, routing rules, and integrations decide whether chat becomes leverage or noise.
Pick a Provider
Choose a platform that matches your workflow, not just your UI preferences.
| Provider | Pricing model | SDK options | Data residency |
|---|---|---|---|
| Intercom | Subscription tiers | Web, mobile | Region-dependent |
| Zendesk Chat | Suite add-on | Web, mobile | Region-dependent |
| Crisp | Tiered plans | Web, mobile | Region-dependent |
| Tawk.to | Free + add-ons | Web only | Limited control |
| HubSpot Chat | CRM-tied tiers | Web, limited mobile | Region-dependent |
If data residency is strict, shortlist vendors first, then evaluate features.
Define Chat Goals
Set goals before you define queues. Otherwise you optimize for speed and ship the wrong conversations.
Imagine three entry points: pricing page, logged-in dashboard, and help center. Each needs a different prompt, owner, and escalation path.
Write goals per page and route from there.
Integration Checklist
List every system chat must touch so nothing breaks at launch.
- CRM for lead and account context
- Helpdesk for ticket creation and handoff
- Analytics for event tracking and funnels
- Tag manager for controlled deployment
- Identity provider for authenticated user mapping
Missing one usually creates manual copy-paste work, and it spreads fast.
Security Basics
Set security expectations early, because chat collects sensitive data by accident.
Decide what counts as PII, where consent appears, and how long transcripts are retained. Define admin roles, audit needs, and whether SSO or SAML is required.
If you can’t describe your retention and access model, you’re not ready to deploy chat.
Create the Widget
Set up the inbox, widget appearance, and channels inside your chat tool’s admin console. This is where “a widget” becomes your widget.
- Create or select an inbox, then assign owners and fallback routing.
- Add your website domain, then generate the widget snippet or install option.
- Pick widget placement, colors, and launcher text to match your site.
- Configure channels like web chat, email, and messaging integrations.
- Set business hours, away messages, and basic automations or triggers.
Get this right and your first conversations land with the right people, fast.
Install on Site
Add the widget script once, in the right place, so it loads reliably without duplicating. If you’re using a lightweight widget like Eloqra (single script snippet, no backend/build step), a direct embed is often the cleanest route—while a tag manager can still be useful when you need strict load rules.
- Choose your install method: tag manager for rules, direct embed for speed.
- Paste the widget script in your tag manager tag or just before .
- Scope where it loads using triggers or page-level conditions.
- Publish changes, then hard refresh and test on desktop and mobile.
- Verify one instance loads using DevTools and by checking for duplicate scripts.
If you see two widgets or flicker, you’ve installed it twice—fix that before anything else. (As a general performance rule, it helps to avoid including JavaScript libraries more than once.)
Configure Behavior
Your widget’s code can be perfect and still feel wrong if it shows up at the wrong moment. Configure behavior so visitors get help when they need it, and your team gets chats they can actually handle.
Targeting Rules
Use targeting to match intent, not curiosity.
- Set page rules for key URLs and templates.
- Add UTM conditions for campaign-specific experiences.
- Apply geo and device filters for regional or mobile-only coverage.
- Exclude internal IPs, admin paths, and staging domains.
- Test each rule in an incognito session.
Bad targeting creates noisy chats that drain your team’s focus.
Triggers and Timing
Triggers decide when your widget earns attention versus interrupts it.
- Start with time-on-page for high-intent pages.
- Add scroll depth to catch readers mid-research.
- Use exit intent sparingly, only on conversion pages.
- Enable returning-visitor logic for faster access on repeat visits.
- Cap frequency so it doesn’t reappear every pageview.
If you have to “force” chats, your timing is doing the opposite of helping.
Pre-chat Questions
Pre-chat fields should remove friction for your agents, not add friction for your visitors. Ask only what changes the next action.
For a typical setup, collect email, topic, and an order ID when relevant. Map each field to your contact properties so CRM, marketing automation, and ticketing tools stay consistent.
Treat every extra field like a tax. Charge it only when you can justify the benefit.
Routing Logic
Routing turns “someone needs help” into “the right person can help.” Define rules before you go live.
- Route by team: Sales, Support, Success
- Route by topic: billing, technical, account
- Route by language: auto-detect or selector
- Route by business hours: open, closed, holidays
- Overflow to email or tickets when queues spike
Routing is your safety rail. Without it, your best agents become your bottleneck.
Connect Your Tools
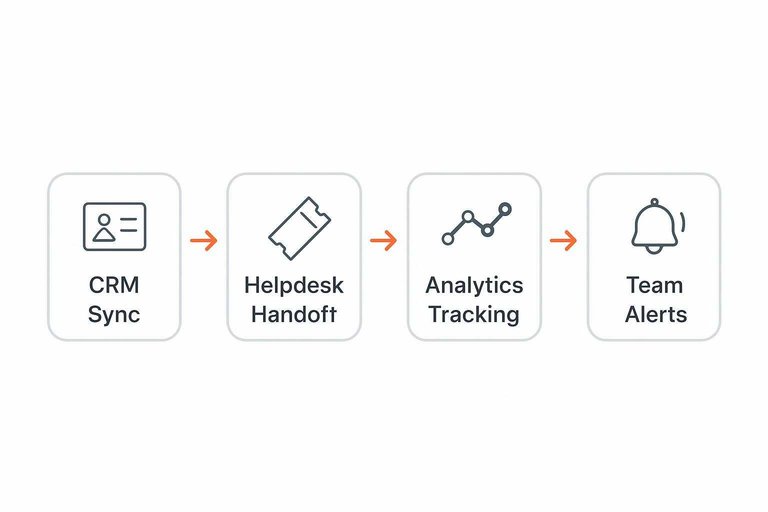
A live chat widget is only useful when the data lands where work happens. Wire it into your CRM, helpdesk, and analytics so every conversation is owned, measured, and acted on.
CRM Sync
You want chat identity to flow into your CRM without creating duplicates. The goal is clean contact history and reliable follow-up.
- Connect your chat tool to HubSpot or Salesforce.
- Choose identity fields: email, name, company, and account domain.
- Map fields to CRM properties, including lifecycle stage and owner.
- Decide rules: create a lead on qualified chats, otherwise update contacts.
- Test with a known user and confirm one record updates.
Get this right and your chat becomes pipeline hygiene, not spreadsheet cleanup. (For HubSpot specifics, see how to connect and customize a chat channel.)
Helpdesk Handoff
Chat is real-time, but many issues need asynchronous handling. Your handoff should create a ticket that is ready to work.
- Enable ticket creation for Zendesk, Jira, or Help Scout.
- Include the full transcript and the visitor’s identity fields.
- Set default tags: product area, channel=chat, and intent.
- Define priority rules based on plan, keywords, or account tier.
- Route to the right queue and verify SLA timers start.
When the chat ends, the work should already be in motion.
Analytics Tracking
You need behavioral events to prove chat is helping, not just happening. Track the moments that signal intent and outcomes.
A clean event set:
- widget_open
- message_sent
- booked_meeting
Add UTM capture on first touch, then attach UTMs to each chat session. Send events to GA4, Segment, or Amplitude with a stable session ID.
Once events exist, you can optimize routing and prompts like any other funnel step. For naming ideas, GA4 publishes a list of recommended events.
Team Alerts
Alerts keep response times tight without spamming everyone. Route messages to the people who can actually help.
- Send new chats to Slack or Teams.
- Route by topic, page, or account tier.
- Assign on-call coverage by schedule.
- Escalate on keywords like “refund” or “security”.
- Add a fallback channel for missed pings.
If alerts are noisy, people mute them, and chat quietly dies. If you’re pushing to Slack, incoming webhooks are a straightforward option.
Add Identity and Consent
Identity and consent decide what your agents can see, and what your widget is allowed to do. Get it right early, or you’ll retrofit privacy later under pressure.
Authenticated Users
Verified identity keeps chats tied to real accounts, not guesswork. It also stops attackers from impersonating paying users.
- Enable secure mode or HMAC verification in your chat provider.
- Generate the HMAC server-side using your secret and the user_id.
- Send user_id, email, plan, and account fields on widget boot.
- Recompute and rotate tokens on login, logout, and account switches.
- Validate on the provider side and reject unsigned identities.
Once identity is cryptographic, “Who is this?” stops being a support question.
Guest Visitors
Guests can be valuable, but they’re where spam and privacy mistakes start. Decide what you need before the first message.
A common pattern is “message first, email on follow-up” for low friction. Another is “email required” on pricing pages to reduce noise.
If you collect anything, keep it minimal and intentional. Every extra field becomes a storage and consent obligation.
Cookie Consent
If your widget drops cookies or tracks behavior, you need consent gating. Load nothing until your CMP says “yes.”
- Map widget features to consent categories in your CMP.
- Default to blocking the widget until consent is granted.
- Load the widget only after the relevant category is accepted.
- On opt-out, disable tracking and clear non-essential cookies.
- Document the categories and behavior for audits.
Consent isn’t a banner. It’s a hard switch in your code path.
Data Controls
Controls prevent “helpful” access from becoming accidental exposure. Configure them before your first transcript export.
- Set retention periods for transcripts and metadata.
- Limit export rights to specific admin roles.
- Require 2FA for admins and agents.
- Enable audit logs for access and changes.
- Restrict agent permissions by team and queue.
If you can’t answer “who accessed what,” you don’t have control yet.
Launch, Test, and Keep Improving
- Run an end-to-end test: open chat on key pages and devices, submit a message, verify routing, notifications, and transcript delivery.
- Validate integrations: confirm CRM/contact creation, helpdesk ticket handoff, and analytics events are firing as intended.
- Check privacy and consent: ensure cookie/banner behavior matches your settings, and verify data retention/export/delete controls.
- Go live and monitor: watch first-week volume, response times, common questions, and missed chats—then refine triggers, targeting, and routing based on what you see.
Frequently Asked Questions
- Does a website live chat widget slow down my site or hurt Core Web Vitals?
- It usually won’t if it loads asynchronously and is deferred until after critical content renders; confirm in Chrome DevTools and PageSpeed Insights after installing. Avoid duplicate scripts, unnecessary third-party trackers, and heavy “all-in-one” bundles on every page.
- Should I put a website live chat widget on every page or only on high-intent pages?
- Most sites start with high-intent pages (pricing, product, checkout, contact) to maximize relevant conversations and minimize noise. After you’ve tuned targeting and routing, expand to broader pages where visitors still get stuck (docs, onboarding, key blog posts).
- How do I measure whether my website live chat widget is actually working?
- Track chat-initiated leads or tickets, first response time, conversation-to-conversion rate, and top pages that start chats using your analytics tool (GA4 events) plus your CRM/helpdesk. Also review transcripts for recurring questions to improve copy and reduce support load.
- Can I use a website live chat widget without a helpdesk or support dashboard?
- Yes—some widgets route messages to a messaging app so you can reply from your phone instead of living in a support console. If that’s your workflow, Eloqra routes chats directly to Telegram while still capturing basic visitor context.
- What if I don’t have agents available 24/7—should I still use a website live chat widget?
- Yes—set expectations with an “offline” message, collect email/name via a pre-chat form, and route after-hours chats to a queue or ticket. You can also schedule the widget to show only during staffed hours and offer self-serve links when it’s closed.
Launch Live Chat in Minutes
Once you’ve planned the stack, installed the snippet, and set behavior, the real challenge is staying responsive without living in another support dashboard.
Eloqra routes every website live chat message straight to Telegram with a lightweight, single-script widget. Get started on the Free Forever plan.
Written by
Eloqra
Notes from the Eloqra team on collecting testimonials and building authentic social proof.
Share: